Friday, July 27, 2012

Absence makes the heart...

We have to apologize for our absence with regards to the blog. We have been busy, busy, busy here at the Meadow. Things have been as dry as I have ever seen here on the Island, and especially in our neck of the woods. How dry has it been? Well going back to 2001, we average 183 mm over the months of June and July. This year (still being a week shy of the end of July) we have had a grand total of 68 mm (keeping in mind that the records are taken from the airport, and there was more than one rain event that conveniently skipped over Stratford )So we are well below half our average for the past 10 years, and there is not much rain in the forecast.
                                                      That's looking back to #4 tee
                                                    Looking back down #13 fairway
 
   So during times like these I am usually asked about our watering practices, and more to the point, how much water do we use. Interestingly, I was interviewed by CBC on that very topic about 2 weeks ago. Basically they wanted to know what we were doing differently to conserve water during the dry spell. I thought about it for a while before hand and came to the conclusion that we really aren't doing things that much differently than normal.Of the approximately 200 acres we maintain between the golf course and the academy, we actively irrigate about 7-10 of them. We also have been moving steadily away from constant irrigation schedules over the past couple of years, and instead relying on deep and infrequent watering practices, along with natural rainfall. For instance, last season we did not purposefully irrigate the fairways at all. We turned on the system a couple of times for testing, but because of the adequate rainfall last season, it just wasn't required. Now this season we have watered more so, but we still only water about 25% of the total fairway acerage. We aim to only put water where it is needed and let things dry out as much as possible. This provides a healthier, more resilient turf, and also a great playing surface. I have not heard to many people complain that their drives are rolling an extra 30-50 yds lately.
 So really this weather is not that big of a problem. It has kept the normal turf diseases at bay, and also has saved us quite a bit on fuel lately as we have mowing a lot less. This has allowed us to also get a lot of other jobs completed because of the labor that gets freed up.

Here are some of the things we have been working on:

                                                  The new range tee is coming in nicely

                                           The other main project we have been working on
                                         is covering the liner on #2 pond. The water level sits
                                         about a foot below the top of the liner, and just doesn't
                                          look quite right.
  We borrowed an idea from Architect Ian Andrew (he used it for bunker edges) and tried using burlap bags filled with topsoil to create a stable lip to sod into. The bags hang down over the edge of the liner.
The next step involved wetting the bags, and then affixing the sod down over the lip. It was a tedious process indeed.
Here are the boys in action. Notice the look of the sod against the water's edge...the look we want.
Here is the pond yesterday with all the heavy lifting complete. As of yet it still does not have the finished look we are hoping for (the dry weather caused the pond to drop another foot...go figure) but once the sod knits, and some seeded areas grow in, things should start to come together. We also took the liberty of trimming the inside of the bank down, which should help with lost balls.

PS

I was fortunate enough to tag along with Halifax Seed salesman, Scott Shanks on Wednesday of this week for a round at Crowbush. What a treat! Nancy Pierce and her crew have the course in wonderful condition and playing really well. There is no other golf course I can think of that continually beats me up (i struggled to a 94 with a 40-50km north wind) but I leave with a smile on my face. The course is really tough, but the routing takes full advantage of the dunes and the views keep reminding you that you are simply standing in one of the most beautiful places on earth.


Friday, June 22, 2012

Grass Type

Continuing on today with the series on what makes greens great, I thought I would touch a bit on grass types. They can make a huge difference in the quality of a green, from how well they roll, to how well they stand up to temperature extremes. How we maintain our greens via cultural practices (topdressing, verticutting, water, ect ) also plays a big role in what species of grass wins out. The two main species we deal with here in Atlantic Canada are creeping bentgrass and poa annua (fescue is also a consideration, but there is only one course seeded out to fescue at this point, so we will see how it goes).
 Most of the older courses you would play around the Maritimes (older than 20 yrs) are predominantly poa surfaces. Over time many people in the industry think that poa dominance is inevitable and they maintain for it. The courses that were built over the past 10 years or so would still have majority bentgrass surfaces, although many would be on the slow road to poa.  These courses would have been seeded out to a newer strain of bentgrass and depending on the cultural practices employed, they would have varying amounts of poa vs bentgrass in their greens.
 People ask me a lot what the difference is between the two species of turf. Well the best way to answer that is to feature each one, give some pros and cons, and let you decide. Most who know me know which one I prefer, but that by no means makes it right. So let's start with Poa...

Poa Annua


• What it likes...
    - lot's of water (frequent small amounts)
    - lot's of fertilizer
    - to be disturbed (via cultivation like verticutting)
    - openings or voids in the turf stand. Poa is a very opportunistic grass that will fill in any void it can.

• Positives
   - it makes a fine putting surface if you can control the seed head development
   - it recovers really quickly because of prolific seed head production
   - it will fill in bare areas of turf (if you want it to)

• What it dislikes...
    - lack of water
    - lack of fertilizer
    - the winter...especially ice cover.
    - the heat of the summer
    - to much traffic
• Negatives
  - susceptible to winter kill (although it can bounce back...by July)
 
   - seed head production makes for bumpy surfaces for putting
   - they have very shallow root systems that make it tough to maintain in the summer.

 So poa has some positives and some negatives for sure. That said, a lot of the best courses in the world (Pebble Beach, Oakmont) have poa surfaces. They also have lots of money to maintain them.

Creeping Bentgrass

• What it likes...
   -  deep and infrequent amounts of water
   - small amounts of fertilizer
   - to be left alone
   - low mowing heights

• Positives
   - deep roots
                                                             That's from #7 green today
 
     - will stand up to disease better than poa if maintained properly
     - makes for a wonderful putting surface
     - holds up well to traffic
     - it generally holds up to winter and deals with ice cover better than poa (but when it dies it does not    come back!)

• What it doesn't like...
    - to much water
    - to much fertilizer (both cause to much thatch production)
    - to be disturbed (if done at the wrong time it allows poa invasion)
   
 • Negatives
  - it can be a prolific thatch producer and becomes very prone to certain diseases if maintained incorrectly.
  - can be slow to wake up in the spring
 

 So there you go, an abridged version of the two main species of turf we use on our greens. Like I said, both can be great putting surfaces, but in the end I will always chose bentgrass. There is a slow movement away from poa in the industry at this time (there are even chemicals that will eradicate poa but not harm the bentgrass) and even a new way of looking at bentgrass maintenance that will allow it to become an even more sustainable species of choice.


PS     The other turf one could choose  is a fescue mixture. Many of the older links course in the UK have predominantly fescue surfaces and they work just fine. Fescue is probably the most sustainable choice for greens, as it requires little in the amount of water, fertilizer, or fungicides. It does not, however, stand up well to any amount traffic (read, no golf carts). The the course I mentioned earlier is the soon to be opened Cabot Links, located in Inverness NS. It will be interesting to see how these surfaces hold up to the rigors of Maritime winters and the inevitable traffic form a full golf season...stay tuned.

  Thanks for reading
paul m

Sunday, June 17, 2012

What makes greens great?


I have been mulling over this post for a couple of weeks now, fine tuning what I wanted it to look like over many quiet mornings changing holes (this morning was stunning). 

Basically what I have been batting around in my head, is what makes one green better than another? How is it that one set of greens are great and another set just so so. I realized after thinking about it for a while, there are many factors that come in to play. From design right through to how we topdress, a lot of people have input into how a set of greens behaves. So this post will deal with the nuts and bolts of constructing and maintaining a great green. We will start at the beginning and work our way through all of the different factors that can make or break a green. The outline will be:
1. Design & Construction
2. Grass Type
3. Topdressing, Aerating, & Verticutting
4. Irrigation Practices & Drainage
5. Fertilizer & Chemical
6. Mowing,  Rolling, & Grooming

 I will try to cover one topic per week for the next while, keeping in mind that because of the nature of my job, that may not happen...


1. Design and Construction
    Well you can't talk about a great set of greens without starting at the beginning. If a set of greens are not designed well, or not constructed with due diligence, there is not much point even starting the conversation. I have seen lots of talented Superintendents manage average surfaces very well, but there is a big difference between a well maintained green and a great all around set of greens.
    We can all remember the first time we set foot on a green that made us pause and take it all in. The one that made you smile because of the fun you had trying to navigate your way to the hole location. Many of these surfaces were built by the renowned "Golden Age Architects", back in the early part of the 19th century with nothing more than a pan and a horse. The best local examples of such greens around the Maritimes  reside mostly at the Stanley Thompson designed courses . Places like Highlands Links in Cape Breton or Old Ashburn located in Halifax are blessed with greens that are bold and full of contour and style.  The original greens at Thompson's only course on PEI, Green Gables,  are still some of the best designed greens I have ever worked with. I will never forget the chuckle I had the first day I was able to cut a pin on the 16th hole at Gables.
    Still the best green I have ever set foot on...

  A well designed set of greens must be fun and full of interesting rolls and bumps, but they also must be placed well within the framework of the architecture. The greens must fit the intended purpose of a hole, varying in size and shape depending on what the architect is trying to accomplish. All to often we play a hole to a green that just leaves us scratching our heads, because it doesn't seem to fit the strategy of the hole.
 Part of this placement a lot to do with the greens surroundings also. You can have a great set of greens, but if they are all set in low valleys and surrounded by trees, then they are never going to live up to there potential. Things like shade, air movement, and proper soil conditions all must be considered by the architect in order to make the greens functional. Even some of the best greens at Green Gables and Highlands Links had started to suffer before thoughtful renovations (by Tom McBroom and Ian Andrew respectively) opened up the green sites and allowed the greens to breath again.

The 4th hole at Anderson's Creek Golf Club is always hampered by to much shade and poor air movement.

The greens at the soon to open Cabot Links in Inverness, NS, appear to have all the pieces of the puzzle in place. Fun design, lots of humps & hollows, and lots of sun and air movement. (the double green on #11 & #13 are pictured above)

 Proper construction goes hand in hand with proper design. The choice of the structure of the green is not as important as the quality of the materials used or the attention to detail with the finish work. There are many different styles of greens to choose from, be it USGA, California style, modified USGA, or push up greens that use native materials such as local sand or good quality topsoil. The contractor must be able to not only adhere to the design principles laid out by the architect, but also must be able to make changes on the fly when necessary. Countless hours are spent by good contractors to get the contours just so, making the green not only fun to play, but functional as well. A great pin position can be rendered useless if the finish work does not allow water to exit the putting surface. Drainage of water both internally and off the surface is paramount to having a great surface to play on.
  The final point with regards to design has to do with how the Superintendent maintains the speed threshold. Many of the older greens that were originally built to accommodate slower green speeds, are being rendered unpinnable with today's quest for fast greens. A lot of the subtlety of a great green can be lost is everyone is four putting the green. Both Superintendents and greens committees must be aware of the ideal speed for the design of the green.  
  So we have built a great set of greens, with lots of internal contours, lots of sunshine and air movement, and the finish work was impeccable. What can possibly go wrong? Well, lots can and mismanagement can ruin a great putting green. The best designed greens in the world don't stay that way by accident. It takes a talented Superintendent, along with a dedicated crew to maintain greens at peak condition. Next week we will start going through some of the ins and outs of proper putting green maintenance.


Friday, June 15, 2012

Project Updates

Well its been a really busy couple of weeks down at the Turf Department, with the guys working really hard to get a few more projects done. The first one is yet another tee leveled...

This is a picture of the white tee deck on #11. We again stripped the old sod, regraded the surface, and laid out new sod. We have been generating most of the sod we have been using for these tee projects in house. The sod for this job came from the very back deck on #18.

But when you take the sod off an existing tee deck, then you must replace it somehow. We decided to core aerify a few other decks, harvest the cores, and use them to regrow the back deck on 18. By using the cores, adding a bit of sand, seed, fertilizer, and water, the deck should regenerate fairly quickly.

This is the deck with the new cores laid out before the final finish work.


The second project we were working on yesterday was codenamed the "Dry Spot Protocol" (i thought it almost sounded like a good movie title). The idea behind this particular project was to reduce the severity of an issue we deal with throughout the summer called localized dry spot. LDS occurs when the higher spots of the greens dry out and become hydrophobic. That basically means these areas stress out and actually repel water. It leads to a lot of hand watering through the heat of the summer.
 The theory behind this project was if we could remove columns of hydrophobic sand and replace them with something that would hold moisture better, then we would not have to resort to hand watering as much. So here is what we did...

1. First we core aerified the affected area.  We used 5/8 tines on our 10 tine holders with the Procore 648.We then simply collected the cores. Luckily most of the areas in question fall to the perimeter of the putting surface, so disruption in play would be minimal.

2. This is a picture of Keith brooming in our special secret mix...(it's really a mix of topsoil, vermicompost, and a product called axis). It was a bit time consuming but we had to do it all by hand because of the small nature of the area disturbed.

3. After a quick shot of ammonium sulphate, Keith was on the hose to water in the mixture. Hopefully over the next while these areas will increase their water retention and thus reduce the amount of this.


This is what the final product looked like. We may have to go back and top up some of the holes next week if there is any significant settling in the holes. The greens we got to yesterday included, #6, #17, #16, and #18. We expect to continue with a few more next week. We will update the progress later.

Thanks for reading...


Friday, June 1, 2012

Listen to the plug...

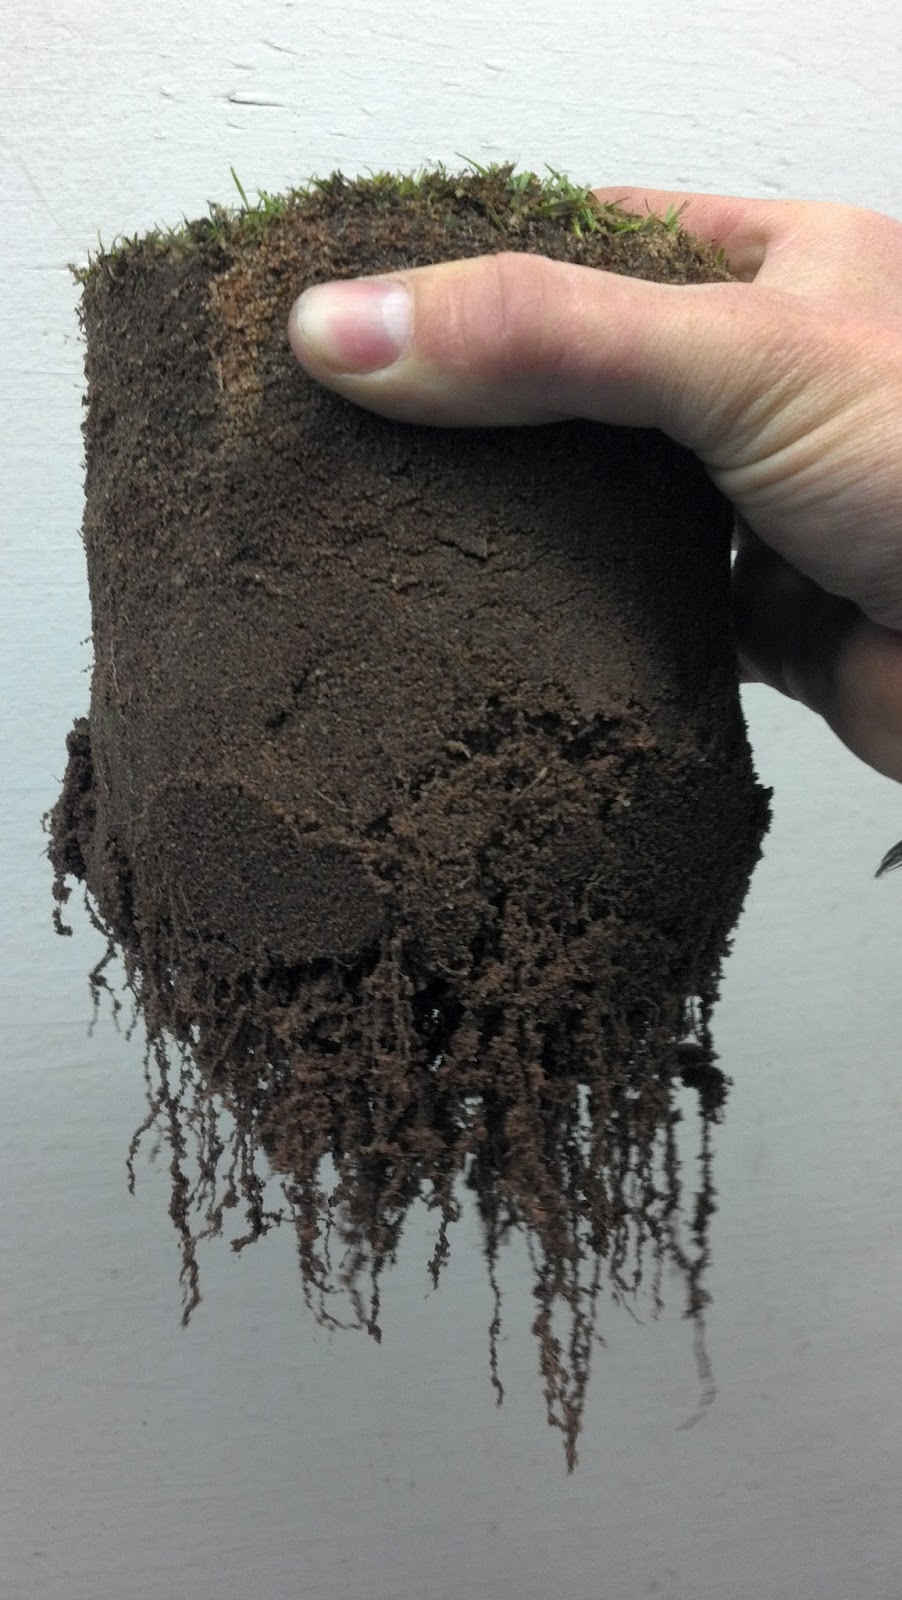
This morning, courtesy of our first big tournament of the year, I ended up with one extra plug when out changing holes (#11 has two holes today). At first I never gave it much thought, but as I traveled around with the plug in my bucket I got to wondering about all the things we can learn from a simple plug...

 Well the first thing we are always looking for is strong, healthy, deep roots. These roots are diving down a solid 8-9" and that is great. Roots are the lifeblood of the turf, and they do a lot to sustain the plants throughout the stress of the summer. Roots absorb water and nutrients, and create a positive symbiotic relationship with all the living entities in the soil. This relationship is the backbone of maintaining healthy greens.

The second thing we tend to focus on is the thatch layer and how it is developing. We have been working hard over the past couple of seasons to reduce our thatch layer and if you look at the top of the plug you can see how the thatch and sand are really mixed together nicely. This occurs when topdressing keeps pace with growth. We are making headway in the battle with the thatch layer, but it will continue for a while yet.

Next we like to see columns of clean sand like the ones pointed out in the picture. These are the result of aerating the greens in the fall and filling the open holes with fresh sand. These channels allow better air and water movement into the green profile, and go a long way to diluting and mixing the thatch layer.


  The last thing that will catch our attention is throughout the column of soil there appears to be uniform moisture content. There is not to much (then the green would be to soft), and there is not to little (the green would be under tremendous stress)...no like Goldilocks, this plug has its moisture just right. This is as a result of a new product we are trying this year, called Revolution. It is a wetting agent, which helps distribute the water we (or mother nature) apply, and move any excess water though the profile efficiently. It seems to be working well so far...will keep you posted.

 So as you can see there are many things that warrant a second look out on a golf course. Most of what you see on the surface is just one piece of the puzzle we work hard at assembling each day. And when things are humming along its a fun puzzle to work on.

Thanks for reading
paul m

Tuesday, May 29, 2012

The sand man

We have been fortunate here at Fox Meadow this season to be trying out a few new pieces of gear. We are in the hunt for a new topdressor and a new greens roller. It's funny how life is in the sense that you don't realize how many accommodations you made for using something inferior until you use some superior. Case in point with both our roller and topdressor. We have been using units that are roughly 6-7 years old, and they are a combination of worn out and outdated. I'm not usually one to jump on to something new just because it's new (read iphone 1,2,3,4,5...) but sometimes switching to a newer unit makes both sense in terms of efficiency and with regards to economics.
 In the roller department we have demoed the Tru Turf, the Greensiron, and the Salso units. All have their strength and weaknesses, much like buying a new car (they almost cost that much also...). With the topdressors we have tried both the Dakota 410 and the Propass 200. These two units both preformed well and we will hopefully be making a decision in the next couple of weeks.
 So what does these purchases mean to you as a golfer? Well it all comes down to the efficiency. We will be able to roll and topdress on a more regular basis, without the fear of breakdowns and lost productivity. For the course that means more consistent playing conditions. We tend to focus a great deal of our attention on the greens and these two units will give us the ability to produce a top quality product.
 As an example here is a quick run through of our topdressing procedure yesterday...

The first step is to apply the sand. We use approximately 12 cubic feet of sand per green. Last season with our old unit we would apply the same amount, but the spread was not even. We would end up with thin areas, coupled with windrows of sand along the edges. With the Propass 200 we were able to put down the same amount of sand, but much more evenly. This made all the difference with the next step...

This is a picture of Paul Howard brushing in the sand. This is the money shot. Last season he would have to deal with the a fore mentioned windrows and brush the green 3-4 times (very hard on the green...picture rubbing your arm with sandpaper). Yesterday Paul managed to work the sand into the canopy with one lap...huge plus for the leaf tissue of the plants and great for efficiency.

Topdressing protocol differs from course to course, but here at the Meadow our next step is to roll. With our old roller, it was all about dependability. We could hum along for 12 holes, only to have the unit conk out unexpectedly. With a new, more efficient and dependable unit, that would become a non issue. (Keith N is    rolling with a Tru Turf unit)

 Then we turn on the water for about 10 minutes. I know that is not a picture of a green watering (its actually # 8 fwy), but I did not get a shot of a green watering yesterday.

 So like I mentioned earlier, its all about productivity and quality. We only have so many resources to work with here at The Meadow, so sometimes the best option is to make a wise purchase in order to make the best use of our time.

Thanks so much for reading
paul m

Friday, May 18, 2012

Aerifying need not be terrifying

As mentioned in the previous post, the course is progressing nicely for the second week of May. We will be starting into our overseeding plan next week on approaches & fairways, and I plan to update you on that procedure next week.
 Today's topic is the condition of the greens. I have had a couple of conversations with some regarding the "bumpiness" of the greens surfaces, and just questions about when things will get into playing shape. Well I was thinking all week as to how to tackle this question, and I think that a little turf 101 might be helpful. We are going to discuss the basics of one of the more important cultural practices we do here at Fox Meadow, and hopefully it will give you a bit more insight into the current condition of the greens.
 Aerification in it's most basic sense is opening up the surface, somehow. There are a few different ways to do this and we will go through them. But first...why do we do it at all?

Here are a few  biggest reason...

                                                                            Thatch
 Thatch is the layer of organic matter that forms between the actual turf canopy and the soil. It is a very natural process and in most normal lawns it is not an issue. It is formed by the decaying leaf tissue and roots that comes from the turf. Different types of turf have varying levels of thatch production, fescue and bluegrass are low producers, but bentgrasses are relatively high producers. Our tees and fairways are a mixture of a lot of different species of turf, and as a result thatch production is not really an issue. Our greens on the other hand are 70-80% bentgrass, so thatch control is an ongoing issue.
 As I mentioned, thatch production in turfgrass is a very natural process, and a certain level of thatch provides an essential cushion for the traffic that golf course turf deals with daily. It only becomes problematic when the levels exceed approximately 3/4" to 1".  You can keep the thatch levels in greens in check via regular topdressing (we will cover this topic in a future post), deep verticutting, judicious use of water and fertilizer, and aerification. Today we will stick with aerification.  


  There are different types aerification that we employ at Fox Meadow. They are solid tining (or venting) and coring. Solid tining is a practice that we do monthly in conjunction with topdressing. We use smaller tines and basically poke a hole in the greens. This hole increases oxygen movement and allows the surface to receive water properly. By rolling after venting you would hardly know we were there.

                                                              These are venting tines
                            

 Core aerification is the process by which we physically remove a core of turf/thatch from the surface. How does core aerification help with thatch control? The most simple way to say it is that when we aerify we physically remove the thatch. We use a machine called a Procore 648 to achieve this.

 For the past two seasons we have used 5/8 tines (there are 60 of them on the unit) and pulled out quite a bit of material...

After we pull the cores we then fill in the open holes with clean topdressing sand. We use just under 100 tons of sand to fill the holes. The sand gets placed via a topdressing unit. The picture below is not us but it gives you an idea of how the process goes...

                           This is the topdressing unit (actually topdressing a green at TPC Sawgrass)

                                  The sand then gets brushed into the holes and the healing begins
                         (again you will notice that this is not our crew...but they are working hard!)

 So as you can see it's quite a process, but the results are worth it. A proper aerification program that includes both solid tining and core aerifying goes a long way to creating healthy greens...


This aerification procedure is part of an overall plan to reduce our thatch production, and it is working. I will go into a bit more detail at a later date regarding the other practices we are employing to help with the thatch control.

  So bottom line, how does this affect the putting quality in the spring of the year? Well it all comes down to timing. Obviously this kind of practice disrupts the surface quite a bit, and it takes time to heal. In order to heal, the greens need proper growing conditions. These conditions generally don't fall between the days we  aerify, around the 22nd of Oct. and now. Once the soil temperatures rise, the bentgrass will wake up and begin to grow naturally. It's really a matter of when you want to put up with the disruption, in the fall, or in the spring.
 People have asked what we are planning to do to heal them faster. Well the answer is basically, wait. We did spray a plant enhancing product called Civitas early this week, and it has actually helped quite a bit. People have also mentioned topdressing or fertilizer. Well, as we mentioned earlier, there is lots of sand on the greens... we would have a hard time fitting any more in. Fertilizer is a dangerous tool this time of year, because of the soil temperatures. If the soil is not ready to facilitate growth naturally, then dumping fertilizer on now does not help. The nutrients will sit in the soil until it wakes up and then, boom, you are bailing hay for a couple of weeks (if you were paying attention you would also chime in, saying that improper fertilizer usage creates thatch...which necessitates more aerification) Not what we want.
 Patience is a virtue and nowhere is it more true than when you are maintaining greens. Sometimes the hardest thing to do is nothing...but that is often the best thing to do.